Key takeaways
- Measure the available floor or tabletop area and the intended changing pad.
- Confirm the changing-surface and storage weight limits separately.
- Choose a working height that lets the primary caregiver stand comfortably.
- Require a stable frame, secure joints, anti-tip hardware, and an adjustable safety strap.
- Prefer reachable storage, but keep creams, medicines, bags, and small objects away from the child.
- Check assembly time and whether a second adult is needed to hold panels or position the furniture.
- Plan for the table’s next use after diapering, especially if choosing a dresser-style model.
The best changing tables combine a correctly sized changing pad, a secure safety strap, a stable base, and storage you can reach with one hand; for most families, a dedicated dresser-style table is the best long-term choice, while a compact foldable station suits small spaces and occasional use.
Our top picks



As an Amazon Associate we earn from qualifying purchases at no extra cost to you. Ratings are shown as listed on Amazon.
Quick picks by situation
| Situation | Best type | What to prioritize | Typical 2026 market range |
|---|---|---|---|
| Small nursery or shared bedroom | Compact tabletop or foldable station | 16 x 32-inch pad fit, non-slip base, shallow footprint | $40–$150 |
| Daily use for one child | Dedicated changing table with shelves | At least 30 inches of usable width, open storage, 25–35-inch working height | $100–$250 |
| Long-term furniture purchase | Dresser with changing-top conversion kit | Removable topper, 3–6 drawers, anti-tip hardware, 50–75 lb drawer capacity | $250–$700 |
| Travel, grandparents, or occasional diaper changes | Portable changing station | Folded size, washable cover, strap, and a firm surface beneath it | $30–$120 |
| Parents with back or knee concerns | Full-height table or dresser | Working height around 36–40 inches, stable legs, supplies within arm’s reach | $150–$700 |
What makes a changing table safer and easier?
1. A pad that fits without gaps
Most contoured changing pads are approximately 16 x 32 inches, but some compact pads are closer to 15 x 30 inches and some larger models measure about 17 x 33 inches. Measure the table’s recessed area before buying the pad. The pad should sit flat with no large side-to-side movement, and its length should not overhang the platform.
A contoured pad with raised sides can help keep a baby centered, but it does not prevent rolling. The safety strap still needs to be fastened during every change, and one hand should remain on the baby whenever the baby is on the elevated surface.
2. A real restraint system
Look for a wide, adjustable waist strap attached to the changing surface rather than a decorative buckle on the pad alone. Check that the strap adjusts smoothly, lies flat, and cannot be pulled loose from its anchor points. A strap is useful only while the caregiver is present; never leave a baby unattended on a changing table, even briefly.
3. Storage that does not require turning away
Open shelves are usually faster to use than drawers because you can see diapers and wipes immediately. Drawers provide better concealment but should open smoothly with one hand. The most practical arrangement is a top shelf or caddy for the current change, with backup supplies stored below.
Avoid placing diaper creams, medicines, plastic bags, or small accessories within a child’s later reach. As soon as a child can pull up, the furniture should be evaluated as a climbing and tip-over risk rather than treated as a permanently safe station.
Best changing table designs compared
Best for value: open-shelf changing tables
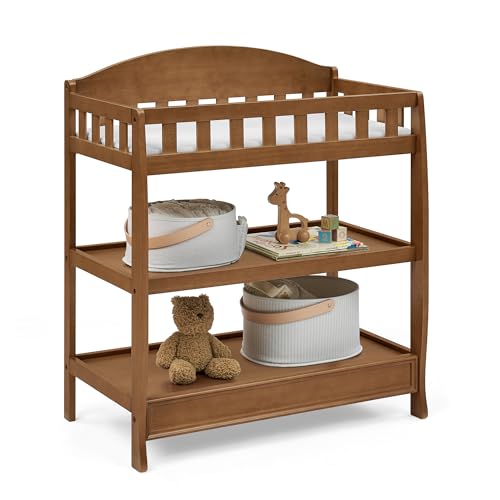
An open-shelf table is often the best changing table for a first nursery because it provides a dedicated surface without the cost and weight of a full dresser. The IKEA SNIGLAR changing table is a familiar example of this category, using a simple wood frame and open storage. Its approximately 72 x 53-centimeter changing surface is compact, so check pad dimensions carefully before purchase.
These tables are relatively easy to assemble, but the trade-off is limited long-term use. Once diapering ends, an open shelf may become a toy or book rack rather than bedroom furniture. Choose one with broad feet, a rigid back or cross-bracing, and wall anchoring hardware.
Best long-term choice: dresser-style changing tables
A dresser with a removable changing topper usually costs more, but it can remain useful for years. Well-known nursery furniture lines such as DaVinci Jenny Lind and Delta Children offer dresser-style options with multiple drawers and changing-top accessories, although dimensions and weight limits vary by model.
For this design, check the furniture’s total width, not just the advertised pad size. A 36-inch-wide dresser gives more room for a wipe container and diaper caddy than a 30-inch model. Confirm that the topper is secured to the dresser and that the manufacturer permits its use with your chosen pad. When diapering ends, remove the topper rather than leaving an unused raised frame attached.
Best for very small spaces: tabletop stations
A tabletop station can work on a sturdy dresser or counter, but it should not be placed on a bed, lightweight table, folding card table, or any surface that can slide. Many are designed around a 16 x 32-inch pad and have low side walls, a small supply compartment, or a washable liner.
This option saves floor space but transfers responsibility for stability to the supporting furniture. Measure the supporting surface, keep all four corners fully supported, and use the station only at a height that lets you keep a hand on the baby without leaning dangerously.
Best for occasional use: foldable changing stations
Folding stations are useful in a guest room or for travel between floors. The important specifications are folded dimensions, open width, locking hinges, pad thickness, and the maximum supported weight. A lightweight frame may be convenient to carry but can feel less stable when a child becomes active.
Do not confuse a portable changing mat with an elevated changing table. A mat belongs on the floor or another approved stable surface; it is not a reason to raise a baby onto a bed or sofa.
Specifications worth comparing before purchase
| Feature | Useful target | Why it matters |
|---|---|---|
| Pad compatibility | Approximately 16 x 32 inches, with no significant gaps | Reduces sliding and prevents edges from catching on the frame |
| Working height | About 34–40 inches for many standing caregivers | Reduces repeated bending; the ideal height depends on the caregiver |
| Changing-surface load limit | At least 30–40 lb, or the manufacturer’s stated limit above the child’s current weight | Leaves room for movement and clothing without operating at the limit |
| Storage load | Approximately 10–25 lb per shelf; verify the manual | Prevents shelves from sagging or the table from becoming top-heavy |
| Safety strap | Adjustable waist strap with two secure anchor points | Provides a practical restraint during supervised changes |
| Assembly | About 30–90 minutes for most flat-packed furniture | More joints mean more opportunities for loose hardware or misalignment |
Weight limits are not interchangeable. A table may have one limit for the changing surface and another for each shelf or drawer. Use the lower applicable limit, follow the manual, and stop using the elevated surface when your child reaches the stated limit or becomes too mobile for safe changes.
Assembly and setup: where safety is won or lost
-
Sort the hardware first. Separate bolts, cam locks, washers, and wall anchors. Using a similar-looking screw in the wrong location can damage a panel or leave a joint loose.
-
Keep fasteners slightly loose while aligning the frame. Tightening one corner completely before the others can make the table wobble. Square the frame, then tighten all joints evenly.
-
Test for movement. Push the table from each side. It should not rock, twist, or lift a leg. Recheck hardware after several days because wood and composite panels can settle.
-
Anchor the furniture. Attach the anti-tip strap to a wall stud or use the correct wall fixing for the wall type. A freestanding dresser is not safe simply because it is heavy.
-
Install the pad and strap exactly as directed. The pad should not bridge a gap or slide when pressed. Route the strap through its intended slots rather than improvising around a corner.
-
Place supplies before the first use. Keep diapers, wipes, a clean outfit, and a disposal method within reach. Put creams and small items in a closed or inaccessible location once the baby can grab.
Ownership realities: cleaning, wear, and common mistakes
The first parts to wear are commonly the pad cover, strap buckle, shelf edges, drawer runners, and adhesive labels or liners. A waterproof pad cover is easier to maintain than an absorbent fabric surface. Follow the cover’s washing instructions, and wipe the changing surface after each mess with a product compatible with its finish. Do not saturate unfinished wood or allow moisture to pool around joints.
Replace a pad if its cover splits, the foam is permanently compressed, the waterproof layer leaks, or the pad slides despite correct installation. Replace a strap if stitching frays, the buckle cracks, or the anchor loosens. A fresh cover cannot restore damaged foam or a weakened restraint.
A common budgeting mistake is comparing only the table price. For example, a $180 table plus a $45 pad, $20 washable cover, and $15 caddy costs $260 before tax. If it is used twice daily for two years, that is about $0.18 per diaper-change setup ($260 divided by 1,460 changes), not counting wipes or diapers. A $500 dresser may cost more initially but can provide storage long after diapering; a $60 portable mat may be the better value for a household that changes diapers only a few times per week.
Final buying checklist
- Measure the available floor or tabletop area and the intended changing pad.
- Confirm the changing-surface and storage weight limits separately.
- Choose a working height that lets the primary caregiver stand comfortably.
- Require a stable frame, secure joints, anti-tip hardware, and an adjustable safety strap.
- Prefer reachable storage, but keep creams, medicines, bags, and small objects away from the child.
- Check assembly time and whether a second adult is needed to hold panels or position the furniture.
- Plan for the table’s next use after diapering, especially if choosing a dresser-style model.
The best changing tables are not necessarily the largest or most expensive. Pick the design that fits the pad without gaps, keeps essential supplies reachable, matches the caregiver’s height, stays stable after assembly, and has a realistic second life when diaper changes move to the floor.